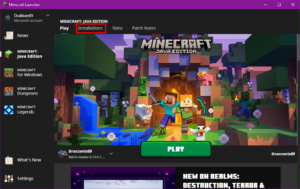
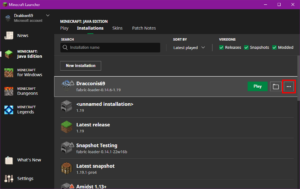
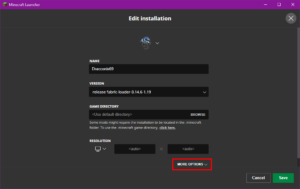
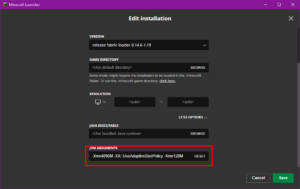
Due to the Minecraft 1.19 Update and at the request of Mojang this version of Skyblock Evolution 2.0 needs to be ran with 4GB of allocated memory. The next few pictures will guide you through changing the profile you want to use with SBE 2.0 with the required memory needed to play the map.
Step 1: After opening the launcher and assuming you already have a profile that you are going to use to play SBE, select “Installations” at the top of the launcher.
Step 2: Hover your mouse cursor of the profile you are going to use and click on the 3 dots on the right and choose edit.
Step 3: At the bottom of the Profile Settings click on “More Options”.
Step 4: Scroll down so that you can see “JVM Arguments” and copy this argument without the quotes and paste it in the box. “-Xmx4096M -XX:-UseAdaptiveSizePolicy -Xmn128M”
- Navigate to your local Minecraft folder:
- On Windows, this is often C:/Users/[user]/AppData/Roaming/.minecraft
(AppData is also often hidden) - On Mac, try ~/Library/Application Support/minecraft
- Users of MultiMC will be able to find their Minecraft Folder in their instance’s menu
- On Windows, this is often C:/Users/[user]/AppData/Roaming/.minecraft
- Unzip Skyblock Evolution 2.0.zip in the saves folder so it creates a subfolder by the same name.
- Launch Minecraft and find Skyblock Evolution 2.0 in the Singeplayer menu.
Don’t forget to update your memory settings – instructions are in the Client Setup tab.
